
I will weave further until I have enough done to hold the temple (or stretcher as some weavers call it) Mine is a Glimakra and is okay for your usual range of home weaving. If you weave rugs, you will need a stronger temple and they come made of metal to take the heavy load. I have an old metal one made by Toika and it's what I would call 'industrial strength'. So here's the temple slipped into place:
So why use one of these? Its for when you are weaving and the draw in is more than an inch, such as in twills. With excessive draw in you can have abrasion of the edge threads and need to do repair threads or your floating selvedges drop away from fraying.With a temple the draw in is greatly reduced. You will however still have shrinkage after the item is wet finished as the threads pull closer together but the edges are uniform. Some weavers say "it slows me down' . Yup, it does but it all depends on what you want to achieve and what you get used to doing. For me the end result is worth the extra step. I'm not what I would call a fast weaver anyhow. I'm more results orientated. So how often do you move the temple? I move it every inch of weaving to be consistent. Or in this pattern, every two full repeats:
 I'd like to talk about the shed for a minute. Some weavers are hesitant to make adjustments to their looms. I have a countermarche loom and they are known for their large weaving shed. One place to make an adjustment is at the top of the beater 'swords'. I shifted the peg to a lower hole:
 To here:
 And this is the size of shed I'm working with: ( I have floating selvedges on if you see a fuzzy black line midway):
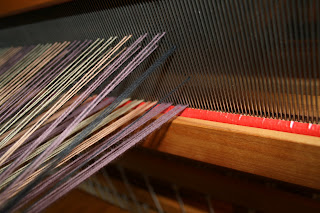 Now that we have checked for threading errors ( none this time.. yeah! ) We can pull out the lease sticks from the back as they can cause some small interference with weaving and advancement of the warp:

 Let's talk about hems and hem stitching now. This is a twill pattern, and the tie up can produce a plain weave, but I won't weave plain weave hems on a twill towel. Why not? With plain weave, the threads alternate over and under every thread which results in a wider, spread section. While with twill, they go over 2-3, and then under 1 and then maybe over 5.... and it all weaves up closer (drawn in) and even closer still (shrinkage) when washed. The difference between the plain weave and twill areas will be greatly magnified and accentuated even more with hemstitching! I use hem stitching on runners and other items that aren't washed as often and even then, I will weave the hem allowance in the primary weave structure. So twill hem allowance, a spacer thread, hemstitch and then weave twill in the main part of the piece. Just find some regular number of ends to use across the cloth and I try to use even numbers such as '4' or '6'. You might like to try trellis hemstitching where the groupings are split in two. Produces a nice effect! We'll discuss finishing techniques in some detail in future entries...
By not stopping to weave special hems, we speed up the time we spend on the towels. All we need to do is simply keep track of things like ornamental borders and the amount woven there so that we can track the inches and reproduce it at the other end of the towel. In this towel, I have woven 10 repeats of the pattern for 4 inches of weaving (this includes the turn back for the hem). I wove a contrasting colour border that measures 1 and 3/4 inches. If my towel's total length is to be 34 inches, I must subtract 5 and 3/4 inches x 2 (for both ends of the towel) from 34 inches. That means the centre of my towel is to be 22 and 3/4 inches or round up to a full 23 inches. When it's all done, I simply throw a few shots of my scrap yarn to show me where one towel ends and another starts.
I have also woven 8 yards continuously of a tartan and then cut apart into towels after it came off the loom. Some tartans don't have convenient places to start and stop! :)So here's the border and some of the main part of the towel, plus a close-up of the weave structure:

Next time, we'll look at the 'new to me' 60 year old counterbalance loom and what's happening there....thanks for stopping by. Any questions or comments, please feel free to leave a message.


 The first picture hows where I have arranged the heddles into the given pattern from my draft. In this case, threading is shafts 6, 7, 8, then 1,2,3,4 and the last group is 1,2,3,4,5. Shafts six and seven are my black ends and the colour is the balance. I'm lucky that this pattern has clear threading groups! It's not always this easy. I always use a slip knot to hold each group as if there is an error such as too many or not enough ends, it's easy to work your way back to find it.
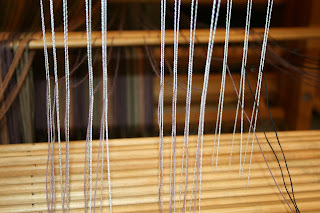
 Okay, now it's time to thread or 'sley' the reed. I guess there's an interesting story behind that terminology! I like to spread the warp ends and divide them into the groups needed for the reed, in this case 2 ends per dent of my 10 dent reed as this is a 20 epi project. I take my time at this stage, or any time of the warping process. I'd rather do it right the first time and get on with weaving over corrections! I have nice music on or my fav, CBC radio. I'm becoming a fount of knowledge as I work away.


 I recommend using a slip knot into each grouping as you sley! It's so darn easy to have someone come along and give the beater a good swing and out they come. That's called a 'do-over' :) Next step is to divide the warp ends into groups. Smaller ones are better and I normally do half inch sections or bouts. Since we are not tying onto the apron bar, we are lacing on, use a small over hand knot to secure the ends of each bout. Comb and tug to make sure that all ends are evenly 'tight' before doing the knot. Lacing on means that we reduce the loom waste of this project and I prefer to use that additional warp (plus some budgeted extra) as a time to 'play' and do some samples. These I share with a group of friends. More on this at another post.


 Once the lacing is done, I apply a bit of tension and then start pulling on the lacing to pull out any slack and gently work my way to the left. I have the end taped down on the beam and re-secure as I keep working out the tension until even. Be sure to have the edge threads evenly tensioned as well. They can be a tad slack but you can always tighten by moving the laces. It sounds silly but I like to close my eyes and run my hand over the warp bouts and 'feel' for the soft spots. Eventually you get an experienced hand and find them. Once you are sure that everything is even and good, secure the end and I use some tape for good measure! (love that tape!)

 The first of these three pictures shows the cords in the peg board all slack and the treadles are on the floor. I choose the centre 8 treadles and pull the cords as per the tie up draft. The second picture shows where I tied up the o's to the upper lamms, and the x's to the lower. Only one tie is needed per row, leave the other one slack. Last picture shows the tie up in place and we're ready to pull the locking pin and start to weave. But that's for next time.... sorry to be a tease!


